AI

This part of AI's blueprint focuses on the ability of the enemy AI to act when it sees the player character come into it's field of vision, and do damage to the player if it catches them. Firstly, if the AI character sees the player in it's vision, it uses the AI move to node to start to move towards them. It takes the pawn as itself as that is the character that will being moving to something. The target actor is the player character as we don't want the AI to be moving towards any other character in this situation. If the AI successfully reaches the player and collides with them, it will do damage to the player equal to that of the value of the damage done variable which in this case is 5, so the player character will take 5 points of damage. Finally, the AI character will the return back to its patrol route.

The blueprint for the AI's patrol route uses a flip flop node, which means it performs each action on after the other, which is good for a patrol as the AI is going to be moving from one position to another. Each route uses the AI move to node, with the pawn being itself again as that is the one that will be moving. The only difference on each side of the flip-flop is that one of the target actors is the first location of the patrol, and the other is the second location. That creates the patrol route as the AI is travelling to one point and then the other continuously, unless it sees the player character, it which case the other blueprint will take over. Finally, it returns to it's patrol until it sees the character to chase.
Health and HUD

For starters, the first thing that has to be done is to create the widgets that show the functions and information on the screen. This blueprint does this when the game begins play, then using a sequence node in order to do both actions when the game starts, one after another. The first sequence creates the health bar widget and displays the health of the player character before adding it to the viewport so that it can be seen by the player. The second sequence creates a second widget for that of blood splatter widget, which I'm using as an indicator to show the player that they are taking damage and are at low health. Similarly to the first sequence, it then adds it to the viewport so it can be seen by the player. The health bar update is a function that updates the health and the health bar in the game every tick of the game, which is why it is connected to the event tick node. Finally, the event at the bottom deals with the damage being done to the player. Simply put, it takes the players current health at the time of the damage, minuses the damage from that value before outputting a new value of the players current health and setting that. (Current Health - Damage = New Current Health).

The health bar update function updates the player characters health and then translates that visually to the health bar that the player can see. In order to calculate the players current health it takes the current health and checks if it is less than or equal to the max health variable and then adds that together with the players health regeneration. The regeneration effect is calculated by taking the value of the regenerate variable and the delta world seconds, which returns the frame delta time in seconds, and then multiplying the two values together to get the rate of regeneration per second. These two values added together gives the player current health, which is calculated every tick of the game so that it is constantly up to date. It then updates the current health in the health bar widget whilst setting the health percentage by taking the current health and dividing it by the max health. For example, if the player is at 50 current health and they have a max health of 100, then their health percentage would be 50/100, or 50%.


Stamina bar

I wanted to include a stamina bar in my game so that the character could sprint, allowing them to more easily get away from danger if they were spotted by the enemy. For starters, when the shift key is pressed, which is what I am using for the sprint key, the players maximum walk speed is set to 1000, compared to the normal speed of 600. A timer then starts which decreases the stamina every 0.5 seconds. The rate of decrease is calculated by taking the current stamina and taking away the stamina rate in order to calculate the new current stamina value. If this current stamina value is less than or equal to zero then the timer is made invalid, and the max walking speed is reset to default as there is no stamina available left for the player to sprint. A new timer then starts that regenerates the stamina before it reaches max and the timer is invalidated again.
When the shift key is released, the max walking speed is automatically set back to 600 and a timer is started to regain any stamina that was lost whilst the shift key was pressed. The stamina is increased in a similar way to how it was lost, this time by adding together the current stamina and the stamina rate, until it is greater or equal to that of the maximum stamina value. The timers are then cleared so they don't continue ticking down or up respectively.

Finally, in the HUD for the health and stamina bar there is a bit of blueprinting that takes a reference of the target character, that being the player and divides the current stamina by the max stamina in order to provide the percentage for the visual bar.
Opening Equipment and Inventory UI


This is functionality of opening some of the UI elements of the game, specifically the Inventory UI and the Equip UI. Starting with the equip UI, it starts by pressing the input key, which for my game is E. The branch checks for whether the UI is already open or not. If it is already open and you are trying to close it, firstly the blueprint removes the UI from it's parent widget, which in this case is the equipment reference. The next branch checks if the inventory is also open or not. If it is not open, then the input mode is set to the game only, and the mouse is hidden so that the player can no longer click on things that are no longer open, before finally setting the is equipment open statement back to false. However, if the inventory is still open, none of this will happen as the player may still want to click on things in their inventory and we don't want to remove the mouse whilst they might still be doing anything, and it will just close the equip UI without removing the mouse etc.
If the equip UI is not open and the player wants to open it, the UI equipment widget is created and is added to the viewport so the player can see it. The input mode is then set to interact with the UI rather than the game, so that moving the mouse around doesn't keep swinging the players camera around at the same time. Finally, it shows the mouse cursor so that the player can click on things in the equip UI, before setting the is equipment open Boolean value to true so if the button is pressed again it will take the other branch route to close it.
The inventory UI works in exactly the same way but instead it checks whether itself and then the equip UI is open instead, and works in the same way as before.

Coding in GameMaker
The three normal enemies in the game have the same actions and events, just with different sprites attached to them. In the create event there is a piece of code that slows down the animation speed of the sprite, then a couple of drag and drop options that set an alarm to 100 steps, and sets the vertical speed of the enemies to 0.2.
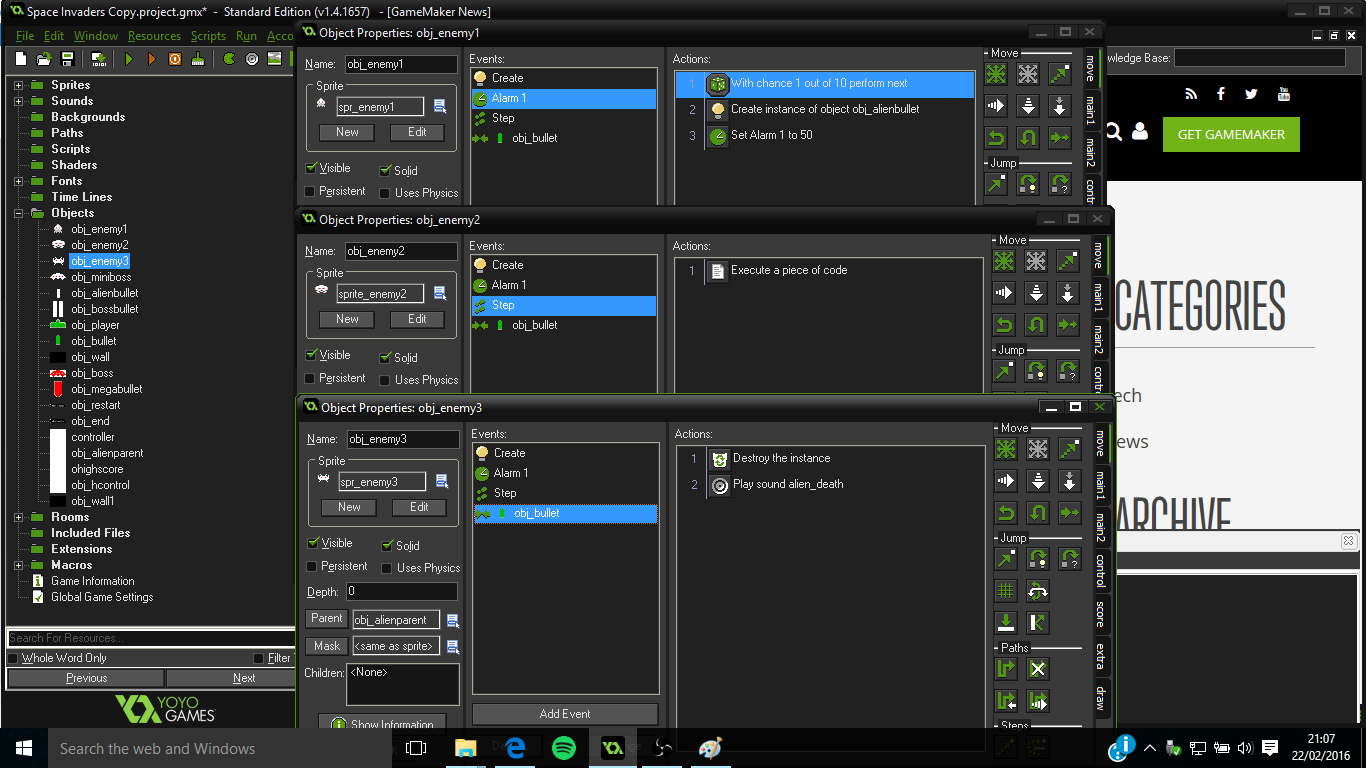
In the alarm event, the game takes the probability of 1 in 10 as whether it is going to create a bullet, which means that there is a 10% chance that the enemy will shoot a bullet at the player. The alarm then resets to 50 steps, meaning that after the first shot the enemies have a much higher chance to shoot. This gives the player a bit of time to get prepared for the level before the shooting rate of the enemies increases. In the step event, the game checks whether the enemies have reached far enough down the y axis to end the game, as if the enemies get too far down the screen, it counts as a game over. Finally the collision event with the player bullet plays the sound of the enemy dying, and destroys the instance.
Obj_miniboss and obj_boss


The only real difference between the boss and the miniboss is that the boss is a larger sprite, and also has a health bar and shoots larger bullets, however, the health is dealt with in another object.
All of these objects have a parent object, which is a spriteless object with no events in it. It is just used when moving on to the next level through the controller.
All of these objects have a parent object, which is a spriteless object with no events in it. It is just used when moving on to the next level through the controller.
obj_player

To start with the player object has some very standard commands, with the left and right keys used to move those ways respectively, it has collisions with each of the enemy bullets within the game that destroy the player and remove a life from the player. The more complicated parts involved with the player come with the ability to shoot bullets at the enemy, as it can't work on a probability basis as the player needs to shoot whenever the space button is pressed. To get around this, I used a variable called canShoot, which is said to true in the create event. This means that when the player object is created, it can shoot a bullet as the variable is set to true. However, when the player presses the space bar, the step event changes the variable to false and sets an alarm to 15 steps, and then creates the bullet. Once this alarm is up the variable is simply set back to true and the player can shoot again. This stops the player being able to shoot a huge amount of bullets and make the game super simple. The player object is set as persistent so that when the room changes the player stays in the same position that they were already in, which makes the game less jarring for the player.
Controller
Controller

My Opinion on Blueprinting
Having only used GML in Gamemaker, I don't really have much to compare it to, but I definitely prefer using blueprints to more written coding. I find it much easier to work my way through the paths of the blueprints, using the links to work out what's going on and why something works the way that it does. I just find it a lot easier to read and understand rather than having to trawl through all the written code trying to find out why something isn't working when you can just follow the links and lines. However, a problem that I do have with coding is that if there is a mistake and you're not sure what is wrong, it can be really hard to find the issue, especially if there is a lot of interlinking functions and you have just missed one link somewhere. Overall though I find it much easier to visualise the coding using blueprints, but I haven't used anything like C++ so I wouldn't know if I would prefer that or not.
No comments:
Post a Comment